


The necessary equipment is as follows:
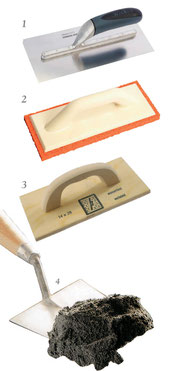
1: Metallic Manara for straightening
2: Trowel with spongy surface for spreading and smoothing finishing materials...
3: Generic trowel for smoothing plaster
4: Trowel for spreading the plaster
Let's start by giving a specific definition of what plaster is and what function it performs:
Plaster can be defined as the "skin" of the walls, i.e. a layer of wall covering that protects the walls from atmospheric agents and must fulfill a very important aesthetic function that must last over time.
In other words, it forms a compact covering made up of several layers, each with different characteristics and functions, which covers the masonry with a thickness generally between 1.5 and 2 centimetres. In certain cases the thickness can even reach 10 centimetres.
When we talk about plaster we are talking about a mortar composed of a binding part (hardener) which incorporates sand with a maximum diameter as a grain size of no more than 2 millimetres, which is mixed with additives, such as cellulose, starch, silica fume and others.
The most common types of plaster are:
- Lime-based plaster, in which the only binder is hydraulic lime, hence the name hydraulic cement lime;
- Lime-cement plaster, in which the binder is made up of a mixture of aerial lime (also called hydrated or slaked lime, or lime putty) and Portland cement, with a prevalence of lime;
- Cement-lime plaster, in which the binder is a mixture of hydrated lime and Portland cement, with a prevalence of cement;
As already mentioned, the plaster has multiple layers, each of which performs specific functions:

1st Layer: The first layer in contact with the masonry is called rough or rough; It carries out the task of creating a sort of "adhesion bridge" between the plaster and the masonry. It is applied in a non-uniform manner until approximately 60-80% of the masonry is covered: with its coarse grain size it creates rough areas which will serve as a grip for subsequent layers. Among the various layers of plaster, the render is the one that presents the highest resistance to physical stress.
2nd Layer: The second layer is called arriccio or arriccioto or rustic plaster, it has an average grain size (about 1.5 millimeters in maximum diameter) and is applied in thicknesses that vary from 1.5 to 2 centimeters, thus playing the role of real skeleton of the entire plaster system. Its main task is to uniform the surface of the walls, eliminating any defects in planarity and verticality; given its thickness, it also constitutes an effective protective barrier, acting as a load-bearing structure for the subsequent layers (finishing plaster or adhesive-tile system).
3rd Layer: The last layer, called intonachino or veil, or civil plaster (and whose application is generally defined as stabilization) essentially has two functions: protecting the plaster and making it aesthetically pleasing. It has a fine grain size, with a maximum diameter of less than 800 microns and its application thickness is less than 3 millimetres.
Now that we have explained what we are talking about when we talk about plaster, let's move on to explaining its correct application.
1ST PHASE: CREATION OF GUIDE SIDES OR STRIPS
Starting from the assumption that the plastering must take place in vertical areas of equal thickness, it is understood that the presence of "guides" is necessary to help us section the work areas. This task is carried out by the sixths, or bands, which section the masonry into equally spaced areas for no more than 1 metre. In fact, each zone must not be more than one meter wide. The bands can be made either with wooden slats which are nailed vertically to the wall or made with the same plaster mixture which will be left to dry before applying the various coats of plaster.
The bands go from the ceiling to the ground and, to determine their thickness, it is possible to use wooden blocks walled at the top and bottom.
To create the sixth or band, wet the wall a little and apply a portion of mortar with the trowel and place it on the tray, or the trowel, held horizontally, and then transfer it back to the back of the trowel. Using the trowel, apply the mixture to the masonry, forming a vertical cord of the desired thickness. At this point, place the wooden strip on the band, holding it vertically, moving it alternately up and down, pressing lightly. In this way the surface of the band is perfectly smoothed and made flat, regardless of the state of the wall.
The corners are prepared by fixing a perfectly plumb board that protrudes about 2 cm beyond the bricks. The hollow that forms must be filled with cement mortar starting from the top.
2nd PHASE: LAYING THE PLASTER
Once the sections have dried and hardened you can move on to applying the plaster, which must be spread by area and until completely covered. We start from the floor and continue towards the ceiling by applying a plaster at least as thick as the bands.
When an area is complete, smoothing is carried out using a long strip placed horizontally. This must be placed on two adjacent bands that act as a reference and then move it to the right and left, proceeding upwards, allowing the strip to remove the excess mixture and drag it upwards so as to fill any gaps.
The work must be continued until the area has the same thickness of internal plaster and the bands are all completely incorporated into the plaster itself.
After the mortar has tightened, i.e. has hardened due to the loss of water, it is passed with a wooden or plastic trowel to eliminate small irregularities and prepare the surface for the final layer of fine stabilization.
3rd PHASE: CORNER GUARDS
A strip is placed along the edge of the wall so as to run alongside the edge, after which it is fixed with small nails and the cavity formed by the edges of the crack and the strip is filled with plaster. Subsequently, using a wooden strip, carefully smooth out the plaster, removing the excess. After a couple of days, the strip is removed and fixed to the opposite edge of the corner and the remaining part of the crack is filled with plaster using the wooden strip as a side. An initial smoothing is carried out with the trowel while the plaster is carefully smoothed with a trowel or a rather smooth wooden board, taking care not to press it excessively.
At your discretion, after carrying out this procedure, you can apply corner protectors to these corners that perfectly recreate the corner. They are usually made of iron and can be purchased from any building material supplier.
4th PHASE: SMOOTHING
This is the final phase of plastering prior to smoothing and is carried out using a trowel. Starting from the top, with the wet trowel, make numerous circular passes without pressing, but insisting if you feel that the surface is not flat, continuing until the surface is regularized to perfection.
5th PHASE: SHAVING
It usually involves the application of a plaster-based mixture but other types can also be used.
Before rolling out the dough it is necessary to make sure that the surface is perfectly smooth and regular. In this regard, before applying the smoothing compound, what is called stabilization is carried out. This is nothing more than a fine mortar that smooths the wall and prepares it for the application of other finishes. Its application must be carried out strictly when the plaster from the previous phases is dry, in fact the wait for the start of smoothing must not be less than 5 days.
Once the stabilization is completed, the smoothing mixture is spread, which must be well mixed and of a creamy consistency. This will be collected on the manara and through this applied to the wall by making long and regular passes to create a thin continuous layer. With the wet manara you then pass over the surface to smooth it.
When the plaster has hardened, the wall will be sanded until it is completely smooth, connecting it with the surface of the neighboring wall. Subsequently it will be possible to carry out the desired painting.
We remind you that this is a process that is best left to expert workers as it is very delicate. In fact, even a single inattention in just one of the sensitive phases listed above will imply the compromise of the entire work.
Other articles:
Concrete block masonry - Installation with mortar, for gluing, corners, jambs and architrave
Ordinary continuous direct foundations, inverted beams and slab foundations
galvanic currents and stray currents what they are and how toprevent
armatura metallica e disarmo delle casseforme del calcestruzzo armato
getti di calcestruzzo effettuati a basse temperature
stagionatura e maturazione accelerata del calcestruzzo
calcestruzzo e calcestruzzo armato - trasporto, getto e costipamento del getto nelle casseforme
confezionamento degli impasti del calcestruzzo armato - immagazzinamento, dosatura e miscelazione
Le casseforme per il getto del calcestruzzo armato - casseforme in legno e casseforme metallica
Il calcestruzzo armato (cemento armato) - cos'è e le sue caratteristiche principali
Classificazione delle fondazioni, tipi di fondazioni e operazioni preliminari sul terreno
Scrivi commento